
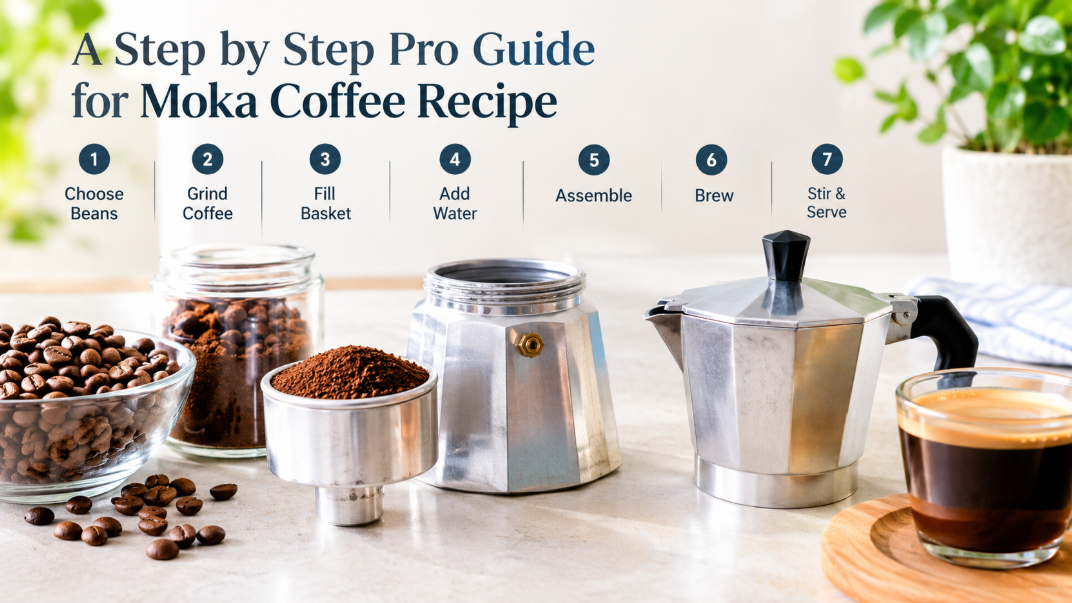
Best Beans for Moka Coffee Recipe: Follow The Pro Brew Guide
A moka pot can produce an incredibly rich, concentrated cup of coffee that sits somewhere between espresso and traditional drip coffee.
Does your moka pot coffee come out bitter, burnt, watery or unpleasantly harsh?
Well, you are not alone
This moka coffee recipe combines techniques from several experienced coffee educators, so you can learn how to make perfect moka pot coffee that looks and tastes like a shot of espresso
Many people struggle with this classic Italian coffee maker because small mistakes in grind size, water temperature, coffee distribution, and heat control can significantly affect the final result.
The good news is that you do not need an expensive espresso machine to make delicious coffee at home. With fresh coffee beans, filtered water, and a few simple techniques, you can transform your everyday moka pot into a reliable brewing tool.
In this guide, you will learn a step-by-step moka coffee recipe, discover simple brewing tips, the right grind size, water ratio, and heat control to avoid bitterness for a perfect cup.
What Is a Moka Pot and Why Use It?
A moka pot is a traditional Italian coffee maker that uses heat and pressure to push hot water through ground coffee. It makes a strong, bold cup that sits between espresso and drip coffee. Water in the lower chamber heats up, builds pressure, and is pushed through the coffee into the upper chamber. The result is intense and chocolatey, with noticeably less acidity
The Three Parts of a Moka Pot
- Lower chamber or boiler: holds the water, which must stay below the safety valve.
- Filter basket: holds the ground coffee.
- Upper chamber: collects the finished coffee.
Moka pots come in different sizes, so choose the one that matches how much coffee you drink. If you want to make great coffee with a moka pot, the basics below matter more than the brand.
As the water heats, pressure builds inside the lower chamber and forces water upward through the coffee grounds. The result is a concentrated, aromatic beverage with a bold flavor and heavier body than most drip coffee.
Although moka pot coffee can resemble espresso, it is not technically espresso. An espresso machine operates at much higher pressure and produces a different extraction profile. A moka pot can still deliver an excellent base for milk drinks, iced coffee, and other espresso-inspired beverages.
Ingredients and Equipment
For this recipe, you will need:
- 18 grams of freshly ground coffee, or enough to fill your basket level.
- Approximately 120 ml of water as a starting reference.
- One three-cup moka pot.
- A burr grinder, if available.
- A digital coffee scale.
- A kettle for heating water.
- Filtered water for a cleaner flavor.
- An optional paper filter compatible with your moka pot.
The exact amount of coffee and water depends on your moka pot’s capacity and the coffee you use. Always follow the manufacturer’s instructions, especially regarding the maximum water level and pressure-release valve.
How to Make Perfect Moka Pot Coffee Step by Step
Step 1: Choose Fresh Coffee Beans
Freshly roasted beans are one of the simplest ways to improve your coffee. Medium and medium-dark roasts are particularly approachable for moka pot brewing because they often produce a balanced combination of chocolate, caramel, and nutty flavors.
Dark roasts can create a rich, intense cup that works well with milk. Light roasts can highlight fruity, floral, and delicate flavors, although they may require more careful adjustments.
Store whole beans in an airtight container away from direct sunlight, heat, and moisture. Avoid keeping them in the refrigerator, where condensation and odors can affect their quality.
Step 2: Find the Best Grinder Setting for Moka Pot Recipe
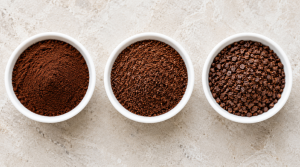
The best grinder setting for moka pot recipe is usually a medium-fine grind, similar to fine sand or table salt. The particles should be slightly coarser than typical espresso grounds but finer than most pour-over coffee.
A grind that is too fine can restrict water flow and create harsh flavors. Grounds that are too coarse may produce a weak or under-extracted cup.
Start with a medium-fine setting and adjust gradually according to taste. Grinder numbers vary between models, so there is no universal setting that works for every machine.
If you do not own a grinder, you can still learn how to make perfect moka pot coffee using pre-ground coffee. Choose coffee labeled for moka pots or a suitable medium-fine grind.
Step 3: Measure the Coffee and Fill the Basket
For a three-cup moka pot, begin by filling the filter basket with ground coffee until it reaches the rim. Level the surface gently without pressing the grounds down.
If you are using a scale, weigh the amount that fills your particular basket. An 18-gram dose is a useful starting point for the recipe demonstrated here, but basket size and coffee density can change the actual amount needed.
Use a small spoon or a WDT distribution tool to break up clumps and distribute the grounds evenly. This helps create a more consistent coffee bed.
Important: Never tamp moka pot coffee as you would espresso. Compressing the grounds can restrict the flow of water and interfere with safe, consistent brewing.
Step 4: Add the Correct Amount of Water
Pour filtered water into the lower chamber, stopping below the pressure-release valve. Never cover the valve or exceed the manufacturer’s recommended water level.
For this moka coffee recipe, approximately 120 ml is a useful starting reference for a three-cup pot. The ideal amount can vary with roast level and your preferred strength.
Filtered water is generally a good choice because water quality influences the taste of the finished beverage. If your tap water tastes strongly of minerals or chlorine, try filtered water instead.
Moka Pot Recipe 3 Cup Water Ratio
For a three-cup moka pot, the following water quantities provide useful starting points:
- 120 g water: A concentrated starting point for many medium-dark or dark roasts.
- 140 g water: A useful reference for light roasts that may benefit from additional extraction.
- 100 g water: An experimental option for a more concentrated brew, although it can increase the risk of under-extraction.
These amounts are recipe references, not universal rules. Keep your coffee dose consistent while adjusting the water quantity so you can identify which change improves the taste.
Step 5: Should You Use Hot or Cold Water?
Both approaches can work.
Starting with room-temperature water is simple, particularly with smaller moka pots. Preheated water can shorten the time the coffee grounds spend warming up and may help when brewing light roasts.
If you use hot water, handle the lower chamber carefully with a heat-resistant towel or suitable grip. Assemble the pot securely before placing it on the stove.
The most important factor is controlling the brewing heat. Water temperature, grind size, roast level, and brewing time work together, so changing several variables at once makes troubleshooting more difficult.
Step 6: Assemble the Moka Pot Properly
Place the filled filter basket into the lower chamber and check that the rim and gasket are clean. Screw the upper chamber onto the base securely, following the manufacturer’s instructions.
Make sure the gasket and filter plate are correctly positioned. A damaged gasket or loose connection can cause steam or liquid to escape instead of allowing the coffee to brew properly.
If you use a paper filter, choose one designed for your moka pot or a compatible coffee filter cut to the correct size. Place it according to the filter manufacturer’s instructions, ensuring it does not obstruct the gasket or interfere with the seal.
A paper filter can reduce fine particles and produce a cleaner-tasting cup. It is optional, so experiment to see whether you prefer the difference.
Step 7: Brew Slowly Over Low Heat
Place the moka pot on a small burner and use low to medium-low heat. On a gas stove, keep the flame beneath the base rather than allowing it to climb around the sides.
Leave the lid open if you want to observe the coffee as it begins flowing, taking care around the hot pot. The coffee should emerge steadily rather than violently sputtering.
As soon as the flow becomes aggressive or you hear pronounced gurgling, remove the pot from the heat. You can also move it away from the burner as the flow slows to control the final stage.
Avoid leaving the pot on high heat until it sputters forcefully. Excessive heat can produce an unbalanced, harsh-tasting brew.
Step 8: Finish and Serve
Once brewing stops, remove the moka pot from the heat. Do not continue heating it unnecessarily.
If you are serving several cups, gently stir the collected coffee before pouring to distribute the flavors evenly.
Your finished coffee should smell rich and inviting, with a concentrated body and a flavor profile suited to the beans you selected.
A layer of foam may appear on top, but this is not the same as true espresso crema. Enjoy the coffee straight, dilute it with hot water, or use it as the base for a milk-based drink.
Pro Tips for the Perfect Moka Coffee
These pro tips for the perfect moka coffee come from the habits that separate average cups from great ones.
- Use filtered water: Hard or off-tasting water flattens flavor. Unevenly distributed coffee can create inconsistent water flow. Use gentle taps and a distribution tool if needed, but avoid compressing the grounds.
- Clean the pot after use: Discard the used grounds, rinse the components, and wipe them with a soft sponge. Let every part dry completely before storing. Coffee residue and stale oils can contribute bitterness flavors. Keep the gasket and filter plate clean, and replace worn components when necessary.
- Mind the gasket: keep the rubber gasket clean for a proper seal, and store the pot loosely closed so it doesn’t age out.
- Use a paper filter: A compatible paper filter can reduce sediment and help produce a cleaner cup. It may also change resistance during brewing, so adjust your recipe gradually. An AeroPress or standard filter paper cut to size works if you can’t find moka-specific ones.
- Don’t tamp: Leveling and tapping is enough. Watch the coffee flow rather than relying only on a fixed brewing time. When it becomes pale, foamy, or excessively sputtery, the brew is approaching its end.
Advanced Tips to Make Better Moka Pot Coffee
Once you have mastered the basic recipe, small adjustments can help you discover more of your coffee’s flavor.
1. Adjust One Variable at a Time
Keep the coffee dose consistent while experimenting with water quantity, grind size, or heat. Changing one variable at a time makes it easier to understand the result.
A smaller water quantity can produce a more concentrated beverage but may also lead to under-extraction. More water can extract additional compounds while creating a less concentrated drink.
2. Try Heat Surfing
Heat surfing means briefly returning the pot to the burner as the flow slows, then removing it again to control the brewing process. This technique is especially useful on gas stoves, where heat can be aggressive.
Use short, controlled adjustments rather than allowing the pot to sputter continuously. Always keep your hands away from hot metal and steam.
3. Explore Different Roast Levels
If you enjoy chocolatey, bold coffee, start with medium-dark or dark roasts. If you prefer more delicate fruit and floral notes, experiment with light roasts and a slightly different water quantity.
How to Brew Specialty Light Roast in Moka Pot
For a specialty light roast, try these adjustments:
- Use freshly ground coffee at a medium-fine setting.
- Start with a three-cup pot filled to the bottom of the safety valve, using the manufacturer’s guidance.
- Consider preheated water to shorten the warm-up period.
- Begin with approximately 140 g of water as a reference for a three-cup pot.
- Maintain gentle heat and observe the flow.
- Taste the result before adjusting the grind or water quantity.
- Light roasts can taste sour when under-extracted. If that happens, try a slightly finer grind or a modest increase in water, changing only one variable at a time.
Moka Pot Coffee to Water Ratio Chart
Ratios shape strength more than most people expect. Treat it as a starting point and adjust to taste.
| Style | Coffee (basket full) | Water | Result |
|---|---|---|---|
| Espresso-style, dark roast | ~18 g | 120 ml | Bold, concentrated shot |
| Light roast | Same dose | 140 g (to valve) | More extraction, clearer flavor |
| Very concentrated | Same dose | 100 g | Strong, risk of under-extraction |
A moka pot is usually designed around the capacity of its basket and water chamber, so there is no single universal coffee-to-water ratio for every model. Use the manufacturer’s fill lines as your starting point, then weigh the water and coffee to make repeatable adjustments.
| Moka Pot Size | Water Guidance | Coffee Guidance |
|---|---|---|
| 1-cup | Fill according to the model’s water capacity | Fill the basket level without tamping |
| 3-cup | Typically around 120–140 g, depending on roast and method | Fill the basket evenly to the rim |
| 6-cup | Use the model’s recommended water level | Fill the larger basket level without compression |
Moka Pot Recipe 3 Cup Water Ratio
For a standard moka pot recipe 3 cup water ratio, use roughly 120 g of water for dark roast and up to 140 g for light roast. Keep the coffee dose fixed and change only the water. More water extracts more but dilutes the brew. Less water gives a stronger, less extracted cup.
At this point, the brewer’s design and the coffee roast both matter. Darker roasts may benefit from a slightly lower water amount, while lighter roasts may need more careful extraction adjustments.
A practical starting point for a three-cup pot is around 120–140 g of water, with the final amount adjusted to the pot’s capacity and your preferred taste.
If you want to know how much coffee for 3 cup moka pot, start by filling the basket level with the rim. Weigh that dose once, then use the same amount whenever you brew the same beans in the same pot.
On the other side, some people ask how much coffee for 3 cup moka pot brewing is correct. The basket should always be full and level. About 18 g is a common weight for medium-dark roast. Densities vary by coffee and roast, so find your own reference: fill and level the basket, weigh it, round the number, and reuse it
Moka Pot Espresso Recipe Ratio
If you want a drink that behaves like espresso, the moka pot espresso recipe ratio is simple: a full basket of fine-medium grounds, a lower water level, and an early stop. Real espresso machines work at much higher pressure, so the cup will be similar rather than identical.
For a practical moka pot espresso recipe ratio, remember that moka pots do not use the same standardized input-to-output ratios as espresso machines. The quantities above are starting points for brewing, not fixed espresso specifications.
Your moka pot’s basket capacity should determine the coffee dose, while the water level can be adjusted to suit the beans and your taste.
How to Make Other Coffee Drinks With a Moka Pot
Moka Pot Cappuccino Recipe at Home
You can prepare a cappuccino-style drink by combining concentrated moka coffee with steamed milk and foam.
- Brew a small serving of moka pot coffee.
- Heat milk in a small saucepan or microwave-safe container.
- Froth the milk using a handheld frother, French press, or another suitable tool.
- Pour the milk into the coffee and finish with a layer of foam.
For a moka pot coffee recipe with milk frother, heat the milk first, froth until it becomes creamy, and pour it over the coffee. A French press can also create foam by moving the plunger up and down through warm milk.
Moka Pot Cappuccino Recipe Without Milk Frother
If you do not have a milk frother, warm milk and whisk it vigorously by hand. Alternatively, pour warm milk into a French press and pump the plunger carefully until it becomes foamy.
Never fill a French press to the top when frothing, because the milk expands. Pour the foam over your concentrated moka coffee and adjust the milk quantity to your preference.
Moka Pot Iced Latte Recipe
For a simple iced latte, brew concentrated moka coffee and let it cool briefly. Fill a glass with ice, add milk, and pour the coffee over the top.
Stir before drinking or leave the layers intact for presentation. For a sweeter version, add vanilla syrup or your preferred sweetener.
How to Make Brown Sugar Moka Pot Iced Latte
Combine one serving of freshly brewed moka coffee with one or two teaspoons of brown sugar while the coffee is still hot. Stir until dissolved.
Fill a glass with ice, add milk, and pour the sweetened coffee over it. Adjust the brown sugar to taste for a caramel-like flavor.
Moka Pot Iced Caramel Macchiato Recipe at Home
Add caramel syrup to a glass, followed by milk and ice. Slowly pour in cooled moka coffee, then finish with a little caramel sauce if desired.
Because moka coffee is concentrated, it provides a strong base for the milk and sweet caramel. Stir everything together before drinking.
Moka Pot Dalgona Coffee Recipe
For a moka-inspired variation, prepare a small serving of concentrated coffee and allow it to cool. Traditional dalgona coffee uses instant coffee, sugar, and water whipped into a thick foam, so moka coffee will not produce the same result by itself.
For the classic method, whip equal parts instant coffee, sugar, and hot water until thick. Spoon the foam over a glass of milk and ice. You can add a small amount of moka coffee separately for a stronger coffee flavor.
Moka Pot Cold Brew Recipe
A moka pot does not produce traditional cold brew because it uses heat and pressure. However, you can make a chilled coffee drink by brewing moka coffee, cooling it promptly, and serving it over ice with cold water or milk.
For genuine cold brew, steep coarsely ground coffee in cold water for an extended period and strain it before serving.
Troubleshooting Common Moka Pot Problems
Why Does My Moka Pot Coffee Taste Burnt?
People often ask why does my moka pot coffee taste burnt. The usual causes are a high flame, poor quality or stale beans, and over-brewing. Very hot water pushed through grounds can scorch flavor. Lower the heat, use better beans, and stop the brew early
Burnt or harsh coffee can result from excessive heat, stale beans, old coffee residue, or a grind that is too fine. Use fresh coffee, clean the pot thoroughly, and brew over lower heat.
Dark roasts are particularly easy to over-extract, so try a slightly lower water level and gentler brewing conditions.
Moka Pot Not Brewing Fix
For a moka pot not brewing fix, start by checking that the upper chamber is screwed on tightly, because a loose seal means too little pressure. Next, make sure the gasket is clean, the filter holes aren’t blocked, and the grind isn’t so fine that it chokes the flow. If coffee leaks from the joint, tighten it and try again
If your moka pot is not brewing, switch off the heat and let it cool completely before inspecting it.
Check the following:
- Make sure the lower chamber contains water.
- Check that the filter basket is not clogged.
- Inspect the gasket for damage or incorrect positioning.
- Ensure the upper and lower chambers are assembled correctly.
- Clean the filter plate and safety valve according to the manufacturer’s instructions.
Never open a hot, pressurized moka pot or attempt to clear a blockage while it is heated. If the safety valve appears damaged or blocked, stop using the pot until it has been inspected or repaired.
Can You Use Pre-Ground Coffee in a Moka Pot?
Yes. Pre-ground coffee is perfectly acceptable if it has a suitable medium-fine texture. Coffee specifically ground for moka pots is a convenient option.
Pre-ground espresso or moka-grind coffee works, ideally from a local roaster so you can track freshness. If you buy from a cafe, ask them to grind a small amount at several settings and mark each so you can find your best grind.
Store opened coffee in an airtight container away from light and heat. Freshly grinding whole beans immediately before brewing usually provides better aroma, but you do not need an expensive grinder to enjoy a good cup.
Frequently Asked Questions
How much coffee for 3 cup moka pot?
Fill the basket level with the rim without tamping. The exact weight depends on the basket and coffee density. Eighteen grams is a useful starting dose for the recipe described here, but measure your own basket for consistency.
Can I use cold water in a moka pot?
Yes. Room-temperature water works well in smaller moka pots. Preheated water can shorten brewing time and may be helpful for light roasts. In either case, keep the heat controlled.
How do I make strong coffee with a moka pot?
For a moka pot recipe for strong coffee, fill the basket correctly, use a suitable medium-fine grind, and experiment with a slightly lower water quantity while keeping the coffee dose consistent. Avoid tamping or restricting the basket.
Why is my moka pot coffee weak?
Coffee may taste weak because the grind is too coarse, the beans are stale, or the recipe produces a brew that is too diluted for your preference. Adjust one variable at a time to find the right balance.
Does a moka pot make real espresso?
No. It produces concentrated coffee using steam pressure, but it operates differently from an espresso machine. The resulting beverage can still serve as an excellent base for espresso-inspired drinks.
Should I use hot or cold water in a moka pot?
Both work. Hot water shortens the time the grounds heat on the stove and suits larger pots and light roasts. Cold water works fine in smaller pots with good heat control.
Do I need to tamp the coffee?
No. Level the grounds and give the basket a light tap. Tamping can choke the flow.
Why should I use low heat?
Low heat produces a slow, even extraction. High heat sends very hot water through the grounds quickly and causes bitterness.
How do I clean a moka pot?
Discard the grounds, rinse all parts, wipe with a soft sponge, and dry fully. Deep clean occasionally, and avoid storing it tightly closed.
Can I use an induction stove?
Stainless steel moka pots generally work on any stove. Aluminum pots need an induction adapter.
Conclusion: Make Better Coffee With a Moka Pot
Learning to make great coffee with a moka pot comes down to consistency. Start with fresh beans, a medium-fine grind, clean equipment, a level coffee bed, and water below the safety valve. Then use gentle heat and pay attention to how the coffee flows.
Once the basic technique becomes familiar, experiment with roast levels, water quantities, paper filters, and milk-based recipes. Keep track of what works, change one variable at a time, and let your own taste guide the process.
Key takeaways:
-
- Use fresh coffee and grind medium-fine, not espresso-fine
- Keep your moka pot clean and completely dry between uses.
- Adjust water quantity and grind gradually to improve flavor.
- Fill the basket fully, level it, and don’t tamp.
- Use filtered, pre-heated water below the valve.
- Brew on very low heat and stop early.
- Experiment with ratios and roasts to find your taste.
With a little practice, your moka pot can become one of the most versatile tools in your kitchen, producing bold morning coffee, chilled summer drinks, and delicious milk-based beverages whenever you want them.
Additionally, a great moka pot cup isn’t luck. It comes from fresh medium-fine grounds, even distribution, filtered pre-heated water, a firmly sealed pot, and low heat.
Apply the steps explained above and you’ll have a rich, chocolatey, espresso-like coffee at home, whether you drink it straight, with milk, or iced everyday.
