
Pour Over Coffee V60 Method: A Beginner’s Guide for Single Cup of Coffee at Home
For your own satisfaction, mastering the pour over coffee v60 method at home without a scale gives you a cup that is sweet, clean and full of flavor.
This beginners guide to making pour-over coffee at home combines championship-level technique with simple, repeatable steps.
Here, you will learn the right ratios, grind sizes, temperatures and pouring patterns that matter, plus how to fix a pour of coffee mistake
Why the V60 Makes Great Pour-Over Coffee
The Hario V60 is one of the most popular tools for manual coffee brewing because it offers excellent control over flavor, strength, and extraction.
With the right technique, you can make a clean, balanced cup that highlights the natural sweetness, floral aromas, fruity acidity, and complexity of specialty coffee.
However, getting consistent results can be challenging for beginners.
Water temperature, grind size, pouring speed, coffee-to-water ratio, and water quality all influence the final cup.
This easy and simple guide to making pour-over coffee at home combines practical brewing principles with tested techniques from experienced coffee brewers.
Whether you prefer a simple morning routine or want to explore specialty coffee flavors, the V60 is a rewarding place to start.
In this method, you don’t need expensive equipment or competition-level skills. A few basic tools, fresh coffee beans, and a repeatable recipe can help you brew better coffee every day.
What You Need for the Pour Over Coffee V60 Method
Before brewing, prepare your equipment and ingredients. Consistency matters more than owning every accessory available.
Essential Equipment
- V60 dripper: A plastic is the cheapest and holds heat best. Ceramic and glass look great but need thorough preheating with boiling water. A glass brewer is designed for pour-over coffee.
- Paper filter: A compatible filter that fits your dripper.
- Fresh coffee beans: Whole beans generally retain their aroma better than pre-ground coffee.
- Kettle: A gooseneck kettle offers greater pouring control, although a standard kettle can work with practice. Plus, an electric gooseneck kettle with temperature control for v60 brewing gives you a gentle, precise stream and a repeatable water temperature.
- Coffee grinder: A burr grinder usually produces more consistent grounds than a blade grinder.
- Coffee digital scale: The best coffee scale with timer for v60 pour over lets you track pour weight and elapsed time on one screen. It is really useful for measuring coffee and water accurately.
- Timer: Helps you track blooming, pouring intervals, and total brewing time.
- Server or mug: Collects your freshly brewed coffee.
A basic V60 pour over kit for beginners doesn’t need to be expensive.
Start with a plastic dripper, compatible filters, a grinder, and a measuring scale if your budget allows. You can upgrade your equipment as your skills develop.
Choosing the Best Coffee Beans for V60 Pour Over
The best coffee beans for V60 pour over depend on your preferred flavor profile and you can use freshly roasted and ground just before brewing.
- Light-roasted beans often highlight floral aromas, citrus, berries, and delicate acidity.
- Medium roasts typically produce a more balanced combination of sweetness, body, and acidity.
- Darker roasts generally offer deeper chocolate, toasted nut, and caramelized flavors.
For your first attempts, choose freshly roasted beans with a clearly stated roast date and tasting notes. Coffee from a reputable local roaster is a good starting point.
Whole beans are preferable because grinding immediately before brewing helps preserve aromatic compounds.
If you only have pre-ground coffee, you can still make a good cup, but you may need to adjust the brewing technique to suit its grind size.
The Basic V60 Coffee-to-Water Ratio
A reliable starting point is a ratio of 1:16, meaning one gram of coffee for every 16 grams of water.
For a single cup, try:
- Coffee: 15–20 grams
- Water: 240–320 grams
- Water temperature: Adjust to the roast level
- Total brewing time: Approximately 2:30–3:30, depending on your recipe and equipment
For example, 20 grams of coffee with 320 grams of water gives you a 1:16 ratio.
If you prefer a stronger cup, experiment with a 1:15 ratio.
Can You Brew Without a Scale?
Yes. You can use measuring spoons and a familiar glass or mug to estimate your portions. Four level teaspoons of ground coffee may provide a rough starting point, but spoon measurements vary considerably depending on grind size and how tightly the grounds are packed.
Similarly, filling a measuring cup with water is less precise than weighing it.
If you’re learning the basics, estimated measurements are perfectly acceptable. Once you want more repeatable results, a scale makes adjusting your recipe much easier.
Step-by-Step: How to Brew V60 Coffee
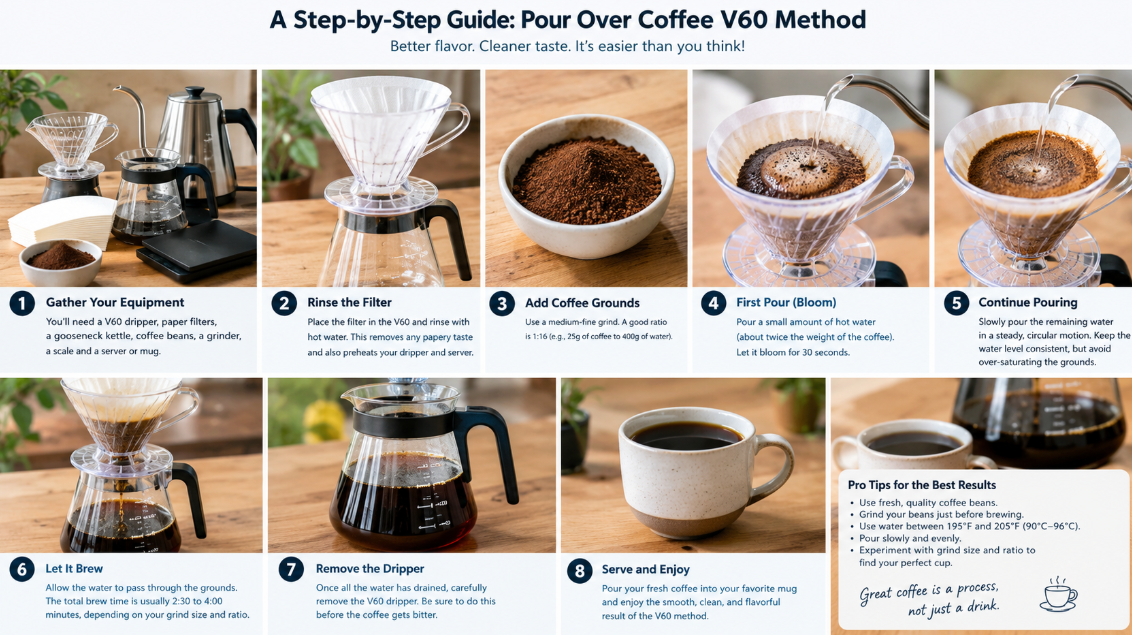
This recipe combines a simple single-cup technique with controlled pouring and an extended bloom.
Step 1: Prepare the Filter Paper and Dripper
Fold the paper filter along its seam if necessary and place it inside the V60. Rinse it with hot water to remove potential papery flavors and warm the brewer.
Discard the rinse water from the server before brewing. This small step prevents the leftover rinse water from diluting your coffee.
Plastic drippers retain heat relatively well and generally require less preheating than ceramic or glass models. Nevertheless, rinsing your filter and preparing the brewer consistently is a useful habit.
When comparing v60 bleached vs unbleached filter paper, the most important step for either type is the same: rinse it with hot water before brewing.
Rinsing removes any papery taste and preheats the dripper and server. Discard the rinse water before you add coffee, because you do not want it in your cup.
Some brewers use a fast, free-flowing paper so they can grind finer and extract more without bitterness. Standard papers work well too
Step 2: Grind Your Coffee
Most beginners grind too coarse for light roasts. Aim for finer than you expect, then go as fine as you can before the cup turns harsh, bitter and astringent.
If you use an entry-level hand grinder, which produces more fines, use a slightly coarser grind and a stronger ratio of around 1:15 that is about 66 grams per liter.
Wider ratios like 1:17 or 1:18 are better once you have more experience
For most V60 recipes, begin with a medium-fine grind and adjust according to taste and drawdown time.
A lighter roast may benefit from a finer grind because it can be less soluble than a darker roast. However, grinding too fine can cause excessive resistance, slow drainage, and unpleasant bitterness or astringency.
Place your grounds in the filter and gently level the coffee bed. Even distribution helps water contact the grounds more consistently.
Step 3: Heat the Water
Water temperature affects how quickly soluble compounds are extracted from coffee.
A practical starting point is:
- Light roast: Approximately 95–100°C
- Medium roast: Approximately 90–95°C
- Dark roast: Approximately 80–85°C
These are starting ranges, not strict rules. Bean freshness, roast development, grind size, and your preferred taste can change the ideal temperature.
For a v60 pour over water temperature for light roast, freshly boiled water can work especially well when using a well-preheated brewer.
If the resulting cup tastes harsh, adjust the grind and pouring technique before making several changes simultaneously.
An electric gooseneck kettle with temperature control for v60 makes these adjustments easier, but it isn’t essential for producing delicious coffee.
Additionally, a brewer who wants more flavor intensity can raise the temperature from 93°C to 95°C, and lower it slightly for a softer cup.
Preheating also matters. In side-by-side tests the measured extraction was the same with and without preheating, yet the preheated cup tasted noticeably sweeter, because a cold brewer drops the bloom temperature
Step 4: Bloom the Coffee
Getting v60 bloom time and technique right sets up the entire brew. Pour roughly twice the weight of the coffee in water, then wait 30 to 45 seconds while carbon dioxide escapes. That lets the water saturate the grounds evenly and improves extraction.
A championship recipe stretched the bloom to 40 seconds with 60 ml of water for 17 grams of coffee. A gentle swirl after the bloom pour mixes the grounds and water so everything starts brewing at the same time
At this point, start your timer and pour approximately 50 grams of water over 15 grams of coffee. Make sure the grounds are evenly saturated.
Let the coffee bloom for about 30–45 seconds. During this stage, trapped gases escape and the grounds become hydrated, helping prepare the coffee for more even extraction.
The ideal v60 bloom time and technique depend on the coffee’s freshness and the recipe you’re using. Freshly roasted beans may release more gas, while older coffee may show less visible bubbling.
A gentle swirl can help wet dry patches, but avoid aggressive agitation that pushes grounds high up the filter walls.
Step 5: Pour in Controlled Stages
For a 15-gram coffee dose and 250 grams of water, divide the remaining water into four portions of approximately 50 grams.
One simple schedule is:
- At the start: Pour 50 grams and bloom for 45 seconds.
- Around 1:00: Pour to 100 grams.
- Around 1:20: Pour to 150 grams.
- Around 1:40: Pour to 200 grams
- Around 2:00: Pour to 250 grams.
Pour in gentle circles with the kettle spout relatively close to the coffee bed. Aim to distribute water evenly without creating a deep crater in the center.
These timings are a guide rather than rigid deadlines. The important principles are even saturation, controlled agitation, and a repeatable pouring pattern.
Step 6: Let the Coffee Drain
After your final pour, give the dripper a gentle swirl if needed to level the coffee bed. Let the water drain naturally.
A total brewing time around three minutes is a reasonable starting point for this single-cup recipe. Different filters, grinders, and beans can produce different drawdown times, so taste should ultimately guide your adjustments.
Remove the brewer, swirl the finished coffee gently, and enjoy.
A Better 1 Cup V60 Technique
A better 1 cup v60 technique was designed to fix a common complaint: standard V60 recipes can be tricky with small doses.
The ratio is about 60 grams of coffee per liter of water, which works out to 15 grams of coffee and 250 grams of water for a single cup
Brewing a single cup can be more difficult than making a larger batch because a small coffee bed responds quickly to changes in water flow and temperature.
Meanwhile, a better 1 cup v60 technique focuses on three things: a suitable grind, controlled pouring, and a consistent recipe.
For 15 grams of coffee and 250 grams of water:
- Use a medium-fine grind as your initial setting.
- Bloom with approximately 50 grams of water for 45 seconds.
- Add water in controlled 50-gram pulses.
- Pour in gentle circles rather than directing a strong stream into one spot.
- Aim for a drawdown around three minutes, then adjust according to flavor.
Divide your total water into five equal blocks. For 250 grams, each block is 50 grams. For a larger brew of 300 grams, use 60-gram blocks. This keeps the math simple so you can focus on pouring.
Keep your kettle relatively close to the coffee bed and use a steady flow. Excessive agitation can move fine particles into the filter and slow drainage.
The goal isn’t to hit every second perfectly. It is to develop a repeatable technique that produces balanced coffee with minimal effort.
The Pouring Schedule
- Prepare: rinse the paper, preheat the brewer with very hot tap water, add 15 grams of ground coffee and make a small well in the center.
- Bloom (0:00): pour up to about 50 grams of freshly boiled water and give the brewer a gentle swirl to wet all the grounds.
- Second pour (0:45): pour to 100 grams in slow circles with the spout low.
- Pulse (about 1:10): add another 50 grams over about 10 seconds, to 150 grams.
- Pulse (about 1:30): add another 50 grams over about 10 seconds, to 200 grams.
- Final pour (about 2:00): pour to 250 grams, give a gentle swirl and let it drain.
Total brew time is usually around three minutes. A pour rate of about five grams per second agitates the bed enough to extract sweetness without digging channels through the coffee.
Common Pour-Over Coffee Mistakes Beginners Make
Understanding common mistakes is often more useful than memorizing a complicated recipe.
The most common pour over coffee mistakes beginners make are easy to avoid once you know them
1. Using the Wrong Water or Ignoring Water Quality
Water is the most underestimated factor in manual brewing. Aim for soft, clean-tasting water.
A bottle of supermarket drinking water that is purified and low in minerals is a good test. Look for a TDS or total dissolved solids figure of roughly 30 to 80, and keep it under 120. Avoid expensive mineral water brands, which are often too hard for pour over
Hard water flattens flavor and can make coffee taste dull or chalky. Switch to soft, low-TDS water as described above.
Water with excessive hardness or alkalinity can make it difficult to achieve balanced flavor, especially with light-roasted specialty coffee.
Try brewing once with clean-tasting, relatively soft drinking water. If the coffee tastes noticeably better, your water may be contributing to the problem.
Avoid assuming that expensive mineral water is automatically ideal. Mineral content varies, and very mineral-rich water may not be suitable for every brewing recipe.
2. Choosing an Unsuitable Coffee-to-Water Ratio
A ratio that is too weak may produce thin coffee, while an unsuitable extraction can create harsh or drying flavors.
A ratio that does not suit your equipment gives thin or bitter coffee. Start at 1:15 to 1:16 and adjust slowly if you want more intensity.
Change one variable at a time so you can identify what improves the cup.
3. Creating Too Much Agitation
A regular kettle produces a strong stream that churns the coffee bed and causes excessive bitterness. This is a classic single cup pour over coffee mistake to avoid and how to fix it: use a gooseneck kettle, or place a drip-assist tool on top of the dripper to spread the water gently.
Pouring aggressively, stirring excessively, or swirling too forcefully can disturb the coffee bed and contribute to uneven extraction or filter clogging.
Use gentle circular pours. If you struggle to control the flow with a regular kettle, consider a gooseneck kettle or a compatible water-distribution accessory.
These are the most important pour over coffee mistakes beginners make, and correcting them can improve your results without purchasing expensive equipment.
4. Skipping the Preheat
Pouring into a cold brewer drops the temperature, especially during the bloom, and the cup tastes less sweet and more acidic. A very hot tap rinse is enough for a plastic V60.
How to Fix Sour or Bitter V60 Coffee
Coffee flavor is a useful guide when deciding what to adjust next.
V60 Sour Coffee Fix
If your coffee tastes sharply sour, thin, or underdeveloped, it may be under-extracted.
Try these adjustments:
- Grind slightly finer.
- Increase the water temperature, particularly for light roasts.
- Improve saturation during the bloom.
- Use a gentle, even pouring pattern.
- Check whether your water is suitable for brewing.
A naturally fruity coffee can have pleasant acidity, so don’t assume every sour note is a defect.
Here, taste is your best guide. This simple v60 sour coffee fix and its bitter counterpart will get you back on track:
- Sour, sharp or thin: under-extracted. Grind finer, use hotter water or extend the bloom.
- Bitter, dry or astringent: over-extracted. Grind coarser, pour more gently or lower the water temperature slightly.
- Hollow or muddy: check your water, then the freshness of the coffee.
If a brew tastes poor, look at grind size and quality first, then water, then the coffee itself. Technique comes last, because most V60 techniques work when the basics are right.
Fixing Bitter or Astringent Coffee
If the coffee tastes harsh, excessively bitter, or drying, investigate whether your grind is too fine or your pouring technique is too aggressive.
Try grinding slightly coarser, reducing unnecessary agitation, or lowering the water temperature for darker roasts.
Slow drainage can be caused by fine particles, filter clogging, or an unsuitable grind setting. Avoid changing every variable at once.
Single Cup Pour Over Coffee Mistake to Avoid and How to Fix It
One common mistake is copying a recipe designed for a larger brew without adjusting the quantities and pouring stages.
For a single cup, use a measured dose and divide the water into manageable portions.
A 15:250-gram recipe is a practical starting point.
If the coffee tastes weak, sour, bitter, or unusually slow to drain, adjust one factor and brew again.
Choosing Filters, Scales, and Kettles
V60 Bleached vs Unbleached Filter Paper
Bleached filters are generally white, while unbleached filters retain a natural brown appearance. Both can work well, provided they fit your brewer and have suitable flow characteristics.
Rinsing paper filters with hot water helps reduce papery flavors and preheats the brewer.
Filter thickness, construction, and flow rate can influence drawdown time, so consistency is more important than color alone.
Best Coffee Scale with Timer for V60 Pour Over
A useful coffee scale should measure small quantities accurately, respond quickly to added water, and include a readable timer.
Look for:
- A capacity suitable for your brewer and server.
- Clear, easy-to-read measurements.
- A built-in timer or an independent timer.
- A stable surface and responsive controls.
You don’t need an expensive competition scale. A reliable basic scale can make your recipe easier to repeat.
Frequently Asked Questions
What is the best ratio for V60 pour-over coffee?
A ratio of 1:16 to 1:17 which is about 60 grams per liter is a great starting point, and 1:15 suits beginners with entry-level grinders.
For one cup of coffee, 15 grams of coffee to 250 grams of water works well, or 20 grams with 320 grams of water.
Then, adjust according to your preferred strength and extraction.
How long should V60 coffee take to brew?
Many single-cup recipes finish in approximately 2:30–3:30. Your ideal time depends on grind size, filter characteristics, pouring style, and coffee freshness. Taste matters more than hitting an exact time.
On the other side, you can set it for about three minutes total, including the bloom. Then, adjust your grind size if the drawdown is much faster or slower
Should I use boiling water for light-roasted coffee?
Freshly boiled water can help extract delicate light-roasted beans. Start near 100°C and adjust if the cup tastes harsh or unbalanced. Preheating the brewer can also help prevent heat loss during brewing.
Why does my V60 coffee taste sour?
Sharp sourness can indicate under-extraction. Try a slightly finer grind, hotter water, or more even saturation and make sure your brewer is preheated. However, pleasant fruity acidity is normal in many specialty coffees.
Can I make V60 coffee without a scale?
Yes. You can estimate your coffee dose with a spoon and measure water using a cup. However, these methods are less consistent, so a scale is helpful if you want to reproduce a particularly good brew.
If you do not have one, a standard ratio of about four heaped teaspoons of coffee for a 10 oz cup is a workable starting point, but a scale removes the guesswork.
Is a plastic V60 better than a ceramic one?
Plastic V60 brewers are affordable, lightweight, and retain heat relatively well with little preheating.
Ceramic and glass versions can also produce excellent coffee, but they generally need more attention to preheating with boiling water because they absorb more heat.
What grind size should I use for V60?
Begin with medium-fine grounds and adjust based on flavor and drainage. If the coffee is sour and drains quickly, try grinding finer. If it is bitter, drying, or drains unusually slowly, try grinding coarser.
Do I need a gooseneck kettle?
No, but its narrow spout gives you better control over flow rate and pouring direction. This can help beginners distribute water evenly and avoid excessive agitation.
If you already own a regular kettle, start with a gentle pour and consider upgrading only if you find flow control difficult.
If you do not have one, keep the spout low and pour slowly, or use a drip-assist tool
Why circular pours and pulses work?
Testing showed that circular pours spread both the water and the agitation evenly across the coffee bed.
A center pour created a crater and an uneven taste unless it was poured from high enough to break the stream, and that gentler pour simply extracted less.
Short pulses let the bed settle between additions, which gives even extraction with plenty of agitation for a sweeter, fuller cup.
Conclusion: Build a Repeatable V60 Routine
The pour over coffee v60 method is simple once you understand the principles.
Use soft water, fresh beans, a well-rinsed filter, a grind that is finer than you think, and short, gentle pulses in circular pours.
Then let taste guide your adjustments. You do not need perfect numbers. You need good ingredients, a repeatable routine and the willingness to taste and tweak.
The pour over coffee V60 method rewards patience, but it doesn’t have to be complicated. Good coffee beans, suitable water, a sensible coffee-to-water ratio, and controlled pouring will take you a long way.
Start with a 1:16 ratio, bloom for 30–45 seconds, and pour gently in stages.
In the mean time, pay attention to how your coffee tastes rather than treating brewing times and temperatures as unbreakable rules.
Key takeaways:
-
- Use freshly ground coffee and clean-tasting water.
- Rinse your paper filter and preheat the brewer then prepare your brewer consistently.
- Use controlled circular pours and avoid excessive agitation.
- Adjust grind size and temperature one variable at a time.
- Choose equipment that improves consistency rather than buying every accessory.
- Use soft, low-TDS water that is about 30 to 80 TDS, under 120 at most.
- Start with a 1:15 to 1:17 ratio and adjust to taste. For one cup, use 15 g of coffee to 250 g of water.
- Bloom for 30 to 45 seconds with about twice the coffee’s weight in water.
- Pour in slow circles with the spout low, at about 5 g per second.
- Use near-boiling water for light roasts and cooler water for darker roasts.
- Troubleshoot by taste: sour means grind finer, bitter means grind coarser.
- Water, grind and coffee quality matter more than any single pouring trick.
With a little practice, you’ll develop a reliable recipe that suits your beans, equipment, and personal taste. The best V60 technique is ultimately the one you can repeat and enjoy every morning.
