
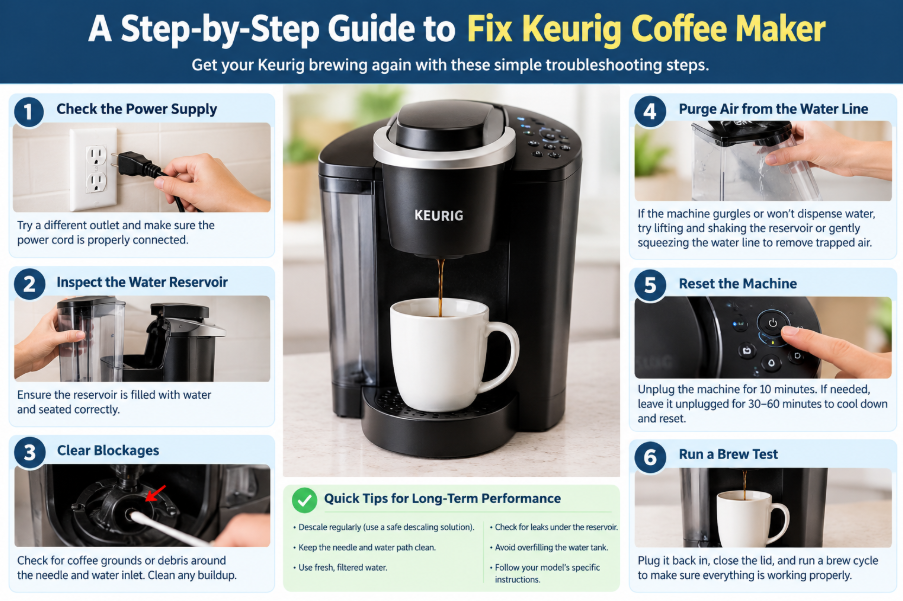
A Step by step Solution How to Fix Common Keurig Coffee Machine Issues
A Keurig coffee maker can suddenly stop brewing for several reasons. Sometimes the problem is as simple as a bad outlet or an empty reservoir. Other times, air can become trapped in the water line, coffee residue can create a blockage, or the machine may need a hard reset.
When you are about to make a coffee with your Keurig machine, you may face classic issue like pressing the brew button and getting nothing but flashing lights or a noisy motor.
Here, some Keurog models like K-Express Essentials and the K-Mini may come along with some issue that need to fix where keurig coffee maker that won’t brew or just stop a slow drip will have a specific solution
The good news is that most problems are simple to solve at home, often in under ten minutes and without tools and with a few simple troubleshooting steps before considering replacement or service.
Here, this article discusses the most common failures, from a machine that won’t power up to one that gurgles and refuses to dispense.
The methods in this guide are proven on solving the troubleshooting issue, that is including checking the power supply, resetting the machine, clearing blockages, and purging air from the water line.
How to Fix a Keurig Coffee Maker That Won’t Brew
If your Keurig powers on but refuses to brew, start with the simplest possibilities. Check the water reservoir, make sure it is properly positioned, and inspect the area where water feeds into the machine.
For models with a removable reservoir, remove it and reinstall it securely. Also check for anything blocking the water inlet. A blockage around this area can prevent the machine from getting the water it needs to brew.
Start With These Basic Checks
- Confirm that there is enough water in the reservoir.
- Make sure the reservoir is correctly seated.
- Check the water inlet for visible blockage.
- Make sure the brew head is properly closed.
- Try another electrical outlet if the machine has no power.
These basic checks are worth doing before attempting more involved troubleshooting.
How to Fix a Keurig Won’t Turn On
If your keurig won’t turn on, don’t assume the machine is broken. Work through these checks in order.
Step 1: Test a Different Outlet
Unplug the machine and plug it into a completely different outlet. Here, Keurig that showed no lights at all started working the moment it was moved to a new socket. If the outlet is near a sink, look for a small reset button on the outlet itself and press it. You can also flip the breaker off and on to reset the circuit.
Step 2: Inspect the Power Cord
It may sound silly, but check the cord along its entire length for kinks, cuts or damage. A damaged cord is a real cause of dead machines and a safety hazard, so replace it rather than use it.
Step 3: Do a Hard Reset
If no outlet works, you need to know how to reset your keurig coffee maker properly. Unplug it and leave it unplugged for at least 10 minutes. If your model has a removable water reservoir, take it off before plugging the machine back in, then put it back once the machine has power. If you suspect the machine ran dry or overheated, wait 30 to 60 minutes before trying again.
Check the Outlet and Power Cord
- Try a different wall outlet.
- If the outlet is near a sink, check whether it has a reset button.
- Reset the relevant breaker if necessary.
- Inspect the power cord for visible damage.
- Make sure the machine is firmly connected to power.
Some Keurig models may also require a firm press of the power or control buttons for approximately two to five seconds. Opening and closing the brew head before trying the buttons again may also help.
How to Reset Your Keurig Coffee Maker
One of the simplest answers to how to reset your keurig coffee maker is a basic power reset. Disconnect the machine from the outlet and leave it unplugged for around 10 minutes.
If the machine may have run dry or overheated, the source suggests leaving it unplugged for approximately 30 to 60 minutes before testing it again. This gives the machine more time to cool down and reset.
How to Manually Reset Keurig Elite Coffee Maker
For users searching for how to manually reset keurig elite coffee maker, the safest source-supported approach is to begin with the basic power-reset procedure rather than immediately opening the machine. Unplug the unit, remove the removable reservoir if applicable, wait, then reconnect it and test it again.
After unplugging and waiting, plug it back in and press and hold the power button and the brew button firmly for 2 to 5 seconds. Some models need a very firm press. You can also open the lid, close it again, and repeat the hold. Every model differs slightly, so try both buttons.
Because Keurig models differ, button combinations and reset procedures can vary. Do not assume that a reset procedure demonstrated on one model applies identically to every Keurig.
Fix Keurig Coffee Maker Water Not Working
If the machine powers on but water does not come out, the problem may involve an empty reservoir, an obstruction, or air trapped in the water line.
Especially for K-Express Essentials, the machine could be heard trying to pump, but no water came out.
The troubleshooting process suggested that air was trapped in the lines.
Fix Gurgling Pump and No Water Comes Out on Keurig K-Express Essentials
When attempting to fix gurgling pump and no water comes out on keurig k-express essentials, start checking whether the reservoir is properly supplying water or not.
But, you must carefully access the water line leading toward the pump and gently squeezing the line while the machine attempts to pump.
The operator could feel air inside the line. After combining gentle pressure on the line with repeatedly lifting the reservoir to help purge the air, water eventually began flowing normally again.
The important lesson is that a gurgling sound does not necessarily mean the pump itself has failed. Air in the water path can produce similar symptoms.
In simple steps, try the least invasive trick first: lift the reservoir up and down several times to purge air. This requires no disassembly. The same approach works when a keurig k-express K26 gurgles and nothing comes out or slow drip
If that fails, unplug the machine and open the back panel carefully, taking care not to break the plastic tabs. Locate the line that runs from the reservoir to the pump, which sits near the top.
Gently squeeze that line while running a 6 oz or 10 oz brew cycle. In testing, air could be felt moving through the line, and once it cleared, water flowed normally and kept flowing through repeat cups. This is the core of a reliable keurig won’t pump water fix.
Recommended Order of Attempts
- Lift the reservoir up and down a few times
- Run a brew cycle and listen for the pump
- If needed, unplug and squeeze the supply line to the pump
- Repeat purge cycles until water flows steadily
How to Fix Keurig Not Pumping Water Heated
If you are searching for how to fix keurig not pumping water heated, first determine whether the machine is actually heating but failing to move water. Listen for the pump and observe whether any water enters the brewing system.
If the motor sounds like it is operating but there is no water flow, check the reservoir and water line before assuming that the heater or pump has failed.
And, if the pump runs but no water arrives, treat it as an air lock. If water flows but stays cold, the heating element may have failed, and a professional repair or replacement may be the better choice
Keurig Won’t Pump Water Fix: Purge the Water Line
For a keurig won’t pump water fix, try purging trapped water and air from the system. On the K-Express Essentials example, lifting the reservoir several times was suggested as an initial step because it does not require taking the machine apart.
If that does not work, try gently squeeze the line that feeds the pump and then attempting the purge again. The process ultimately removed the apparent air problem and restored water flow.
As a last resort, some users report success by unplugging the machine, removing the reservoir, turning the unit upside down and gently shaking it to dislodge water from the tube, which can relieve a vacuum problem. Let it drain, plug back in, and test. Treat this as a final attempt, and be gentle.
Keurig Mini Won’t Dispense: What to Check
If your Keurig mini won’t dispense, first check the amount of water in its reservoir. The K-Mini has minimum and maximum fill markings, and insufficient water can prevent normal brewing.
The K-Mini also has a useful purge function. With the machine plugged in, place a mug on the drip tray and press and hold the K button. Doing this can purge water remaining inside the internal water hose. Once water stops dispensing, release the button.
Alternatively, check the basics before assuming a fault. The K-Mini has a fixed reservoir with Max and Min fill lines, so confirm there is enough water.
Then open and close the handle to activate the brew button, and press the brew button.
A flashing pattern that blinks twice and fades indicates the machine is heating water, and a solid light means brewing has started
A handy hidden feature: plug in the machine, place a mug on the drip tray, then press and hold the brew button without pressing power. This purges leftover water from the internal hose. Release once water stops flowing
Fill the reservoir using the same mug you will drink from. Pouring in more water than your cup holds is a frequent mistake. If it happens, press the brew button during brewing to stop the cycle manually. Also remember the K-Mini automatically shuts off 90 seconds after the last brew
Use the Correct Amount of Water
The K-Mini example also highlights an easy mistake: filling the reservoir with more water than the drinking vessel can hold. If you fill the reservoir to 10 ounces but use an 8-ounce cup, you may need to manually stop the brew by pressing the K button while brewing.
For more predictable results, use the same mug you plan to drink from when measuring water for the reservoir.
How to Fix Keurig Needle Clogging
Another common reason a Keurig may stop brewing properly is a blockage caused by coffee residue. If you need to know how to fix keurig needle clogging, start by checking the brewing area for visible coffee buildup.
At this point, you can try removing a board or component from the affected area and clearing coffee blockage from the water path. Once the obstruction was removed, the machine was able to work again.
Always unplug the machine before attempting any cleaning or physical inspection around internal components.
Fix Keurig Coffee Grounds in Cup Issue
If you are trying to fix keurig coffee grounds in cup issue, inspect the brewing area for accumulated coffee residue. Grounds can interfere with normal water movement and may contribute to clogging around the brewing needle or water path.
Regularly cleaning the brewing area can help prevent buildup. If the problem is accompanied by slow flow or a pump that runs without dispensing water, treat it as a possible water-path obstruction rather than simply a coffee-quality problem.
Also, check that the pod isn’t punctured incorrectly, clean the pod holder and exit needle, and make sure you use the proper filter with a reusable pod. Avoid grinding too fine
Keurig K-Express K26 Gurgles and Nothing Comes Out or Slow Drip
A keurig k-express K26 gurgles and nothing comes out or slow drip symptom is consistent with the air-in-line issue. The machine’s motor was clearly attempting to pump, yet water initially failed to emerge.
Start by lifting the reservoir several times. If necessary, carefully access the line leading toward the pump and gently squeeze it while the machine attempts to draw water. And, after the air was purged, normal flow returned.
Fix Keurig Add Water Error Light Won’t Turn Off
If you need to fix keurig add water error light won’t turn off, check the reservoir that isn’t seated correctly or a stuck float. Make sure it contains enough water and is correctly connected to the machine.
Remove the reservoir, check that the connection at the bottom is clear, and reseat it firmly.
On Keurig models with a fixed reservoir, fill to the Max line and make sure nothing blocks the inlet that feeds the machine.
Also inspect the reservoir connection area for blockage. Always check the section where the water is fed into the machine and making sure nothing is obstructing the connection.
Keurig Will Not Power On After a Descale
If your keurig will not power on after a descale, do not immediately assume that the descaling process permanently damaged the machine. Start with the power troubleshooting steps: test another outlet, check the cord, and perform a complete unplugged reset.
If the machine may have overheated or run dry, give it a longer cooling period before testing again. The cooling may approximately need 30 to 60 minutes in this situation.
Residual solution or moisture can confuse the controls. Unplug the machine, empty and rinse the reservoir, let everything dry, then repeat the 10-minute hard reset above before plugging into a fresh outlet
Fix Keurig Blinking Lights All Buttons Flashing
When attempting to fix keurig blinking lights all buttons flashing, begin with a power reset. Unplug the machine, wait, remove the reservoir, reconnect it, and try the controls again.
On some models, holding the power buttons firmly for two to five seconds can help initiate a reset. Opening and closing the brew head before repeating the button sequence is another useful technique to try.
Flashing buttons often mean the machine is waiting for a lid cycle, so open and close the handle fully. A single hard reset clears most cases
Fix Keurig Error Message “Prime”
For a keurig error message “prime” fix, concentrate on restoring reliable water flow. Check the reservoir, its connection, and the water path. If the machine is making pump sounds without dispensing water, trapped air may be contributing to the problem.
Try the reservoir-lifting and water-line purging techniques described above before moving to more invasive troubleshooting.
Follow the air-purge steps in the next section to restore water flow
Fix Keurig K-Brew and Chill Clogged
If you need to fix keurig k-brew and chill clogged, begin with the same fundamental checks: water supply, reservoir connection, and possible blockage.
Here, you can remove obvious obstructions, confirm water can enter the machine, and reset the unit when appropriate.
Keurig Makes Loud Noise When Brewing
If your keurig makes loud noise when brewing, pay attention to what happens immediately afterward. A pump that makes unusual sounds while little or no water comes out may indicate air in the water line or restricted water flow.
In K-Express Essentials, the motor could be heard attempting to pump while no water was being dispensed. After purging the air, normal water flow returned.
Best Descaling Solution to Fix Slow Keurig
If your Keurig has gradually developed slower water flow, descaling may be worth considering.
At the same time, checking for blockages and trapped air, but it does not provide enough evidence to recommend a specific descaling solution.
How to Fix Leaking Water Under Keurig Reservoir
When trying to how to fix leaking water under keurig reservoir, first inspect the reservoir connection and surrounding area for visible problems. Make sure the reservoir is seated correctly and check whether anything is preventing a proper connection.
If water is leaking from an internal component, avoid operating the machine while investigating. Water and electricity create an obvious safety concern, so unplug the machine before inspecting or moving it.
How to Fix Keurig Leaking Bottom
Before using replacement parts to fix keurig leaking bottom, check the reservoir area, water connections, and blockages.
If a leak continues after these checks, model-specific documentation or professional service would be more appropriate than guessing which internal part needs replacement.
Why Keurig Machines Stop Working to Brew
Keurig brewers are simple devices: a reservoir, a pump, a heating element and a needle that punctures the pod. When one of these parts is blocked, starved of water or confused by a software glitch, the whole machine seems dead.
The usual culprits are:
- Air trapped in the water lines, which stops the pump from drawing water
- Coffee grounds or mineral scale blocking the needle or internal passages
- Power problems such as a bad outlet, damaged cord or tripped breaker
- A needed hard reset after overheating or running dry
- Worn seals, gaskets or reservoir connections that cause leaks
Safety Tips Before Troubleshooting a Keurig
- Unplug the machine before opening, tilting, cleaning, or inspecting internal areas.
- Do not work on an energized machine when water may be present.
- Do not force plastic tabs or covers that may break.
- Check the power cord for visible damage.
- Allow a machine that may have overheated to cool before testing again.
- If an internal electrical fault or persistent leak is suspected, stop troubleshooting and seek qualified service.
Frequently Asked Questions
Why is my Keurig running but not dispensing water?
Possible causes include insufficient water, a blocked water path, or air trapped in the line. If you can hear the pump but see no water, try purging air from the water line as a possible solution.
How long should I unplug my Keurig to reset it?
The process may need approximately 10 minutes for a basic hard reset. If the machine may have run dry or overheated, it suggests leaving it unplugged for about 30 to 60 minutes.
Why is my Keurig making a gurgling sound?
Gurgling can occur when the pump is attempting to move water while air is trapped in the water line. The K-Express Essentials troubleshooting example eventually restored flow after purging the air.
Why won’t my Keurig turn on even in another outlet?
Check the power cord, try a reset, and make sure the machine has had enough time to cool if it may have overheated. Some Keurig models may also respond to holding their buttons firmly for several seconds.
How do I purge water from a Keurig Mini?
According to the source, plug the K-Mini in, place a mug on the drip tray, and press and hold the K button until water stops dispensing. Release the button after the internal water hose has been purged.
How do I know if my Keurig needs a reset or a repair?
If it has no lights, flashing lights or won’t respond to buttons, a reset usually solves it. If it heats poorly, leaks continuously or makes grinding sounds after cleaning, it likely needs repair.
Is it safe to squeeze the internal water line?
Yes, gently, but only while the machine is unplugged for access and handled carefully. Plug it back in only once the panel is positioned safely, and never touch internal parts while powered. If you are not comfortable, contact Keurig support.
How often should I descale my Keurig?
Every three to six months, more often with hard water.
Should I repair or replace an old Keurig?
If the fix is a clean, a reset or a cheap part, repair it. If the pump or heater has failed on an older unit, replacement is often more economical.
Conclusion: Start With the Simplest Keurig Fix
When a Keurig stops working, the best approach is to troubleshoot systematically rather than immediately assuming the machine has failed.
Most Keurig failures come down to power glitches, trapped air or clogs, all of which you can solve at home with basic steps and a little patience. Work from the simplest fix to the more involved one, always unplug before touching internal parts, and keep up regular cleaning and descaling to prevent repeat problems
Start with the basics: check the outlet, inspect the power cord, confirm the reservoir contains enough water, and make sure the reservoir is properly connected.
If the machine powers on but does not dispense water, investigate the water path. A blockage or trapped air can prevent normal brewing even when the pump is operating. The K-Express Essentials example shows that gently working the water line and repeatedly lifting the reservoir can purge trapped air and restore water flow.
For power problems, a simple unplugged reset may be enough.
For clogging, inspect the brewing and water-entry areas for coffee residue. And whenever you work around water, electrical components, or the internal parts of the machine, unplug Keurig first.
Key Takeaways
-
- Try another outlet before assuming the Keurig is broken.
- Unplug the machine for about 10 minutes for a basic reset.
- Allow 30–60 minutes if overheating may have occurred.
- Check the reservoir and water inlet for blockages.
- If the pump runs but no water comes out, consider trapped air.
- On the K-Mini, holding the K button can purge water from the internal hose.
- Clear coffee buildup from the brewing and water pathways.
- Always unplug the machine before inspecting internal areas.
- Try a new outlet, check the cord and do a 10-minute hard reset before anything else.
- Press and hold the power and brew buttons for 2 to 5 seconds to reset many models.
- Gurgling with no water usually means air in the line, so lift the reservoir up and down first.
- Clear needle clogs and descale regularly to prevent slow brewing and grounds in your cup.
- Always unplug the machine before inspecting parts.
