

How to Get Crema Thick Foam on Espresso: 7 Fixes That Work
There’s nothing quite like pulling a fresh espresso shot and watching a beautiful golden-brown layer of crema settle on top. But if your espresso looks flat, watery, or has almost no foam, you might wonder what you’re doing wrong.
The good news is that getting better crema doesn’t always require an expensive espresso machine or complicated techniques. The secret often comes down to choosing the right coffee beans, getting your grind size right, preparing the coffee puck properly, and maintaining consistent extraction.
One factor that many beginners overlook is the difference between Arabica and Robusta beans. Even when your equipment and technique are excellent, the type of coffee you use can make a noticeable difference in the amount and stability of crema.
Let’s explore what crema actually is, why it forms, and how to get crema on espresso using seven practical techniques you can try at home.

What Is Espresso Crema?
Crema is the thin, reddish-brown foam that naturally forms on top of a freshly pulled espresso. It consists of tiny gas bubbles trapped within a liquid containing coffee compounds, including melanoidins and emulsified oils.
During roasting, coffee beans produce carbon dioxide (CO2), which becomes trapped inside their structure. When hot water passes through finely ground coffee at high pressure, some of that CO2 dissolves into the brewing liquid.
Once the espresso leaves the pressurized brewing chamber and enters your cup, the pressure drops. The dissolved CO2 escapes as tiny bubbles, creating the foam we recognize as crema.
A typical espresso machine operates at approximately nine bars of pressure, helping produce the conditions needed for this process.
Crema also contains compounds that help stabilize the bubbles. Melanoidins, which develop during roasting, are among the important surface-active compounds involved in maintaining the foam.
How Crema Forms
Crema begins in the roaster. Roasting reactions such as the Maillard reaction and Strecker degradation create CO2, which stays trapped inside the bean. Fresh beans still hold plenty of it when you grind them.
- Under pressure: at roughly nine bars, hot water dissolves CO2 from the grounds, much like force-carbonating a drink.
- At the cup: once the coffee leaves the basket, the pressure drops and the CO2 escapes as tiny bubbles.
- Stabilizing the foam: compounds in the coffee, such as melanoidins from roasting, wrap around the bubbles and make the foam strong enough to last.
Does Crema Mean Your Espresso Is Good?
Crema can provide useful feedback about your extraction, freshness, and coffee selection. However, a thick layer doesn’t automatically mean your espresso tastes better.
Some espresso blends naturally produce more crema than others. Robusta beans, for example, generally create a thicker and more persistent foam than Arabica beans.
Crema can also contribute roasted and bitter characteristics. Some coffee enthusiasts even prefer stirring their espresso or removing a little crema to reduce bitterness.
On the other side, crema is useful feedback that you brewed fresh coffee well, and it adds to the look and enjoyment of espresso. It does not prove the coffee tastes good. Some research suggests more crema mainly increases the “roasty” note, and many baristas stir it in or even skim it off to reduce bitterness. If a shot tastes great, don’t chase crema for its own sake.
7 Proven Tips on How to Get Better Crema on Espresso
1. Choose Freshly Roasted Whole Coffee Beans
Freshness is one of the most important factors when learning how to get better crema on espresso. Freshly roasted coffee contains more retained CO2, which helps create the bubbles responsible for crema.
As coffee ages, it gradually releases carbon dioxide. Older beans therefore tend to produce less crema, even when your espresso machine and preparation techniques are working correctly.
For a good starting point, choose whole beans roasted approximately two to six weeks ago. Make sure to use beans between two and five weeks after roasting.
Always check the roast date rather than relying only on the expiration date printed on the packaging.
Why Whole Beans Are Better Than Pre-Ground Coffee
Grinding coffee exposes more surface area to oxygen, accelerating the loss of freshness and aroma. Pre-ground supermarket coffee may already have lost much of its trapped CO2 before it reaches your kitchen.
For better results:
- Purchase whole coffee beans with a clearly marked roast date.
- Grind immediately before brewing.
- Store beans in an airtight container away from heat, moisture, and sunlight.
- Avoid using coffee that has been sitting open for extended periods.
2. Experiment With Arabica vs Robusta
If you’re wondering why your espresso has no crema despite using fresh beans and good equipment, the answer might simply be your coffee variety.
Arabica and Robusta behave differently during espresso extraction. Arabica is often appreciated for its sweetness, aromatic complexity, and balanced flavor. Robusta generally produces more crema, stronger body, and more earthy or chocolatey characteristics.
Robusta also typically contains more caffeine and has a higher CO2 content after roasting. Its relatively lower lipid content can help produce a more stable foam.
Which Coffee Produces More Crema?
- 100% Arabica: Often produces less crema, with delicate aromas and more complex flavor characteristics.
- 80% Arabica and 20% Robusta: A balanced option for people who enjoy sweetness alongside thicker crema and chocolatey notes.
- 50% Arabica and 50% Robusta: Usually produces more crema with a stronger, fuller-bodied espresso.
- 100% Robusta: Can create substantial crema, although its earthy and woody flavors may not appeal to everyone.
A particularly useful starting point is an 80/20 Arabica-Robusta blend. This combination provides some of Arabica’s sweetness and complexity while adding the body and crema associated with Robusta.
Ultimately, the best choice depends on your taste preferences. More crema doesn’t necessarily mean a better-tasting espresso.
3. Find the Correct Espresso Grind Size
Grind size directly affects how quickly water moves through your coffee puck. If the coffee is too coarse, water passes through too easily, resulting in a fast extraction and potentially thin crema.
On the other hand, grinding too finely creates excessive resistance. Water may struggle to pass through the puck, potentially causing uneven extraction and unpleasant bitterness.
The goal is a consistent, fine grind designed specifically for espresso.
Use a 1:2 Coffee-to-Water Ratio
A useful starting recipe is:
- Coffee dose: 18 grams in a standard double basket. Be sure to stay within the basket’s limit.
- Espresso yield: about twice the dose, for example 18 g in, 36 g out.
- Extraction time: Approximately 25–30 seconds, depending on whether you start the timer at pump-on or first drip.
This is commonly called a 1:2 brew ratio. For example, if your basket holds 16 grams of coffee, you can start with approximately 32 grams of espresso.
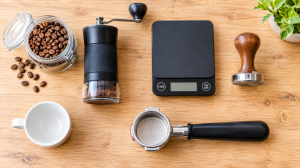
Use a digital coffee scale to measure both the coffee dose and final yield. This makes it easier to identify whether your extraction is running too quickly or slowly.
How to Fix Espresso Extractions for Timing and Taste
-
- Extraction finishes too quickly: Adjust to a finer grind to increase resistance and slow the flow.
- Extraction takes too long: Adjust to a coarser grind to allow water to pass through more easily.
- Espresso tastes sour: Check for under-extraction and adjust grind size or extraction time.
- Espresso tastes excessively bitter: Check for over-extraction and consider grinding slightly coarser.
Make one adjustment at a time and taste the result. The goal is balanced flavor and consistent extraction, not simply the thickest possible crema.
On the other hand, sour flavors usually mean under-extraction. Grind finer, pull a longer shot with a 1:2.5 or 1:3 ratio, or raise the temperature if your machine has a PID. Grinding finer both adds surface area and slows the flow, increasing contact time
And, bitterness usually means over-extraction. Grind coarser, stop the shot sooner, or lower the temperature. If tweaking doesn’t help, look at the beans: fresh light roasts can taste more acidic and may be confused with sourness, while very dark roasts can lean bitter.
4. Prepare and Tamp Your Coffee Puck Properly
Good puck preparation helps water flow evenly through the coffee grounds. Poor distribution can create weak spots where water passes through too quickly, a problem known as channeling.
Channeling produces uneven extraction. Some coffee grounds become over-extracted while others remain under-extracted, resulting in an unbalanced espresso with inconsistent crema.
Follow These Puck Preparation Steps
- Measure your coffee: Dose the correct amount for your basket.
- Break up clumps: Use a Weiss Distribution Technique (WDT) tool to distribute the grounds evenly.
- Level the coffee: Use a distribution tool if available to create a flat surface.
- Tamp evenly: Apply firm, consistent pressure with a level tamper.
- Add a puck screen: If you have one, use it to help distribute incoming water and keep the group head cleaner.
You don’t necessarily need expensive accessories. Consistent distribution and a level tamp are more important than owning every espresso tool available.
5. Use the Right Espresso Basket and Machine
Your espresso basket also influences crema formation. There are two common types: pressurized and non-pressurized baskets.
A pressurized basket creates additional resistance through a restricted outlet. This can produce foam even when your grind size or coffee freshness isn’t ideal.
However, that foam doesn’t necessarily have the same texture or quality as naturally formed crema from a properly extracted espresso.
A non-pressurized basket relies on the coffee puck itself to create resistance. Grind size, dose, distribution, and tamping therefore have a much greater influence on the extraction.
For experienced home baristas, a good espresso machine with a non-pressurized basket offers better control and a clearer view of extraction quality.
A super-automatic espresso machine can also produce good crema, although the results depend on its brewing system and coffee settings.
6. Pay Attention to Water Quality and Temperature
Water is often overlooked when troubleshooting espresso. However, it plays an important role in extraction, flavor, and the long-term condition of your machine.
Extremely hard water can negatively affect brewing performance and contribute to mineral buildup inside your espresso machine.
Using appropriately filtered water can improve consistency and help protect your equipment. A simple water filter may be useful if your household water is particularly hard.
Temperature matters as well. A practical starting range is approximately 90–96°C (194–205°F), depending on your coffee and machine.
Allow your espresso machine to warm up before brewing. A warmed-up machine helps provide more consistent brewing conditions from shot to shot.
7. Use Pre-Infusion and Monitor Your Extraction
Pre-infusion introduces water to the coffee puck at the beginning of brewing, allowing the grounds to become evenly saturated before full extraction pressure develops.
Use approximately 10 seconds of manual pre-infusion before continuing the shot.
During extraction, watch the espresso flow and monitor the final weight using a scale.
For an 18-gram dose, stop the extraction when you reach approximately 36 grams of espresso, adjusting the timing and ratio according to taste.
Consistent monitoring helps identify problems such as channeling, uneven flow, and premature blonding.
Common Issues No Crema on Your Espresso
Understanding common espresso mistakes that cause no crema can save you time and prevent unnecessary equipment purchases.
Why Is My Espresso Crema Thin?
Thin crema can result from several factors:
- Using old or stale coffee beans.
- Choosing 100% Arabica when you prefer a thicker crema.
- Using a grind that is too coarse.
- Extracting too much water from the coffee dose.
- Uneven puck preparation or channeling.
Start by checking the roast date, then adjust your grind size and extraction ratio.
Why Is My Espresso Crema Dark and Bitter?
Dark crema is often associated with darker-roasted coffee and a more concentrated espresso. Darker roasts generally produce more CO2 during roasting, although they also degas faster as they age.
If your espresso tastes excessively bitter, check whether the grind is too fine or the extraction is running too long. You can also experiment with a lighter roast or stir the espresso before drinking.
Some coffee enthusiasts remove a little crema with a spoon because it can contribute roasted and bitter characteristics to the drink.
Why Is My Crema White and Bubbly?
Pale, bubbly crema can be associated with a weak-looking or under-extracted espresso. A grind that is too coarse may allow water to pass through the puck too quickly.
Check your coffee dose, grind setting, and extraction time. Also remember that pressurized baskets can produce artificial foam that looks different from naturally formed espresso crema.
Why Does My Crema Disappear So Fast?
Crema naturally loses its bubbles after extraction because the dissolved CO2 escapes from the espresso. However, older beans and coffee with less retained CO2 often produce less persistent crema.
Arabica beans can also produce less stable foam than Robusta because of differences in their composition, including lipid content.
Try fresher beans and experiment with an Arabica-Robusta blend if a longer-lasting crema is important to you.
How to Fix Bubbly Espresso Crema
First, determine whether you’re seeing naturally formed crema or artificial foam from a pressurized basket. Then check your beans, grind consistency, puck preparation, and extraction time.
Use fresh whole beans, distribute the grounds evenly, tamp level, and aim for a balanced 1:2 extraction as a starting point.
Why Your Espresso Has No Crema: The Main Causes
When your espresso has no crema, the cause is usually one of these factors below. Change one variable at a time so you can tell which fix worked.
a. Use Fresh Whole Beans
Freshness is the single most important factor. Grounds begin losing CO2 and flavor through oxidation almost immediately, just as freshly cracked pepper beats the pre-ground kind. Aim for beans roughly two to five weeks past the roast date. Beans that are extremely fresh can carry too much CO2, while old beans have little left to form foam.
- Check the roast date, not just the expiry date.
- Buy whole beans and grind them just before brewing.
- Avoid supermarket bags of unknown age.
b. Dial In Your Grind Size
Grind size controls resistance, and resistance builds pressure. Too coarse and water rushes through, leaving thin, pale foam. Too fine and the shot chokes and turns bitter. A good starting point is a 1:2 ratio in about 25 to 30 seconds, for example 18 grams in and 36 grams out.
c. Choose the Right Beans: Arabica vs Robusta
If you are wondering how to get crema on espresso arabica vs robusta, the short answer is that robusta gives more. Studies suggest robusta holds about twice the CO2 of arabica after roasting, and it contains less oil, which helps the foam last. Lipids work against foam stability, much as a little egg yolk ruins meringue.
- 100% arabica: can make a good shot, but usually less crema that fades quickly.
- 80% arabica / 20% robusta: a popular Italian-style blend with thick crema, chocolatey notes and a creamy body.
- High-robusta blends (50–70%+): very thick crema, but they can taste woody or earthy.
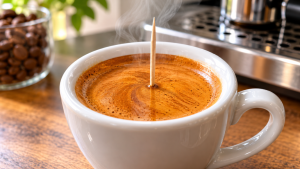
In one side-by-side test, a 100% arabica shot lost its crema within moments. An 80/20 blend produced a much thicker layer, and even the “toothpick test” worked, with the toothpick standing upright. A blend with roughly 70% robusta did the same.
d. Roast Darker
Darker roasts generally produce more crema than lighter ones, and the color of the crema reflects the roast and the strength of the shot. Light roasts have less gas, so less crema. Medium to medium-dark espresso roasts are the sweet spot for foam.
e. Get Pressure and Temperature Right
A machine that can’t reach about nine bars will struggle. Professional machines often run around nine to eleven bars, while some home and even commercial machines run out of tune and fall short. Temperature matters too. Brewing around 205°F (about 96°C) works better than a machine that hasn’t warmed up, so give it time before pulling your first shot. A PID controller helps hold the temperature steady, though it isn’t essential for crema.
f. Use the Right Basket
A pressurized basket almost guarantees foam, even with old beans or a poor grind, because the single tiny exit hole creates artificial pressure. The foam, though, looks better than it tastes and hides your mistakes. A non-pressurized basket gives you real feedback on your tamp, grind and puck prep, and it produces a better shot once dialed in.
g. Don’t Ignore Puck Prep and Water
- Break up clumps with a WDT tool to reduce channeling.
- Level the surface and tamp with firm, even pressure.
- Use filtered water if yours is very hard, which improves flavor and protects your machine.
How to Get Crema Without an Espresso Machine
Authentic espresso crema requires the combination of pressure, dissolved CO2, and coffee compounds that stabilize the bubbles.
A French press or traditional Moka pot cannot reproduce the same pressure-based extraction as a proper espresso machine. These brewing methods can produce concentrated coffee, but they don’t create authentic espresso crema.
Some alternative machines and devices use pressurized brewing systems to create foam-like layers. However, their results may differ from the natural crema produced by a traditional espresso extraction.
If authentic crema is your priority, an espresso machine capable of producing sufficient brewing pressure is the better choice.
Common Espresso Mistakes with No Crema that You Should Avoid
The most common espresso mistakes with no crema as the result are easy to avoid:
- Using pre-ground or stale coffee.
- Not warming up the machine, which makes the water too cool.
- Grinding too coarse, or too fine so the shot chokes.
- Choosing a light-roast, 100% arabica bean and expecting thick foam.
- Relying on a weak machine that can’t reach proper pressure.
- Changing several variables at once, so you can’t tell what helped.
Frequently Asked Questions
1. What coffee beans produce the most crema?
Robusta generally produces more crema than Arabica. A blend containing approximately 20% Robusta and 80% Arabica is a good starting point if you want thicker crema without losing too much sweetness and complexity.
2. Does darker roasted coffee produce more crema?
Generally, yes. Darker roasts tend to produce more CO2 during roasting and can create more crema. However, they also degas faster as they age, so freshness remains important.
3. How fresh should coffee beans be for espresso?
A useful starting point is approximately two to six weeks after the roast date. Whole beans generally retain their freshness and CO2 better than pre-ground coffee.
4. Is more crema always better?
No. Crema can indicate useful information about freshness and extraction, but it doesn’t guarantee better flavor. Some people prefer espresso with less crema because excessive foam can contribute roasted and bitter characteristics.
5. Can a budget espresso machine produce good crema?
Yes. A budget espresso machine can produce crema if it provides suitable brewing pressure and you use fresh beans, an appropriate grind size, and consistent puck preparation. However, pressurized baskets may produce foam that differs from naturally formed crema.
6. Does a Moka pot produce real espresso crema?
No. A traditional Moka pot operates differently from an espresso machine and doesn’t produce the same pressure-based extraction. It can make strong, concentrated coffee, but not authentic espresso crema.
7. How to get thicker crema on espresso?
Combine fresh beans in the two-to-five-week window, a medium-dark roast, a blend with some robusta, a non-pressurized basket and a properly warmed machine at about 205°F. Keep your dose consistent and aim for a 1:2 ratio. These changes stack, so even small improvements add up.
8. How old should my beans be for good crema?
Roughly two to five weeks after the roast date works best. Anything much older has lost most of its CO2, and extremely fresh beans can give foam that is too airy.
9. Can I get good crema with pre-ground coffee?
Usually not. Pre-ground coffee loses gas and freshness quickly. A pressurized basket will still produce foam, but it won’t have the same texture or quality.
10. Does more crema mean better espresso?
No. Crema shows you brewed fresh coffee well, but it doesn’t guarantee great flavor. Some baristas stir or skim it to cut bitterness.
11. Is robusta bad for espresso?
Not at all. Good and bad examples exist in both species. A small share of robusta with around 20% adds crema and chocolatey notes, while too much can taste woody or earthy.
12. Why is there no crema even with fresh beans?
Check the grind, machine temperature and pressure, basket type and bean type. A 100% arabica light roast is a common reason, and fresh beans alone won’t compensate.
Conclusion: Focus on Freshness Beans, Balance, and Consistency
Learning how to get crema on espresso doesn’t have to be complicated. Start with freshly roasted whole beans, experiment with an Arabica-Robusta blend, and make sure your grinder produces a consistent espresso grind.
Pay attention to puck preparation, water quality, machine temperature, and extraction timing. A starting recipe of 18 grams of coffee producing 36 grams of espresso in approximately 25–30 seconds is a useful foundation.
Most importantly, remember that crema is only one part of the espresso experience. A beautiful, thick layer might look impressive, but the real goal is a balanced, enjoyable shot that suits your taste.
Key Takeaways
-
- Choose fresh whole beans, preferably roasted within the last two to six weeks.
- Robusta generally produces thicker and more stable crema than Arabica.
- Experiment with an 80% Arabica and 20% Robusta blend to produce thicker, longer-lasting crema
- Use a consistent espresso grind and a balanced 1:2 coffee-to-water ratio.
- Prepare your puck evenly to minimize channeling.
- Use suitable water and allow your espresso machine to warm up.
- Don’t chase crema at the expense of flavor. A delicious espresso is always the priority.
- Aim for a 1:2 ratio in about 25–30 seconds and adjust the grind to match.
- Brew at around 205°F with a machine that reaches proper pressure.
- Pressurized baskets fake crema; non-pressurized baskets teach you more.
- Pale and bubbly means under-extracted; dark and bitter means over-extracted.
- Change one variable at a time and let taste guide you.
Good crema isn’t magic. It comes from fresh whole beans, a dialed-in grind, a suitable blend, a warmed-up machine with proper pressure and a basket that gives honest feedback. Fix one variable at a time, trust your taste, and remember that a beautiful shot is a bonus, not the goal.

One thought on “Easy Tips to Get Thicker Crema on Espresso”