
How to Make Steam Milk with Perfect Microfoam & Silky Texture for Latte Art
Struggling with thick foam when making a latte art?
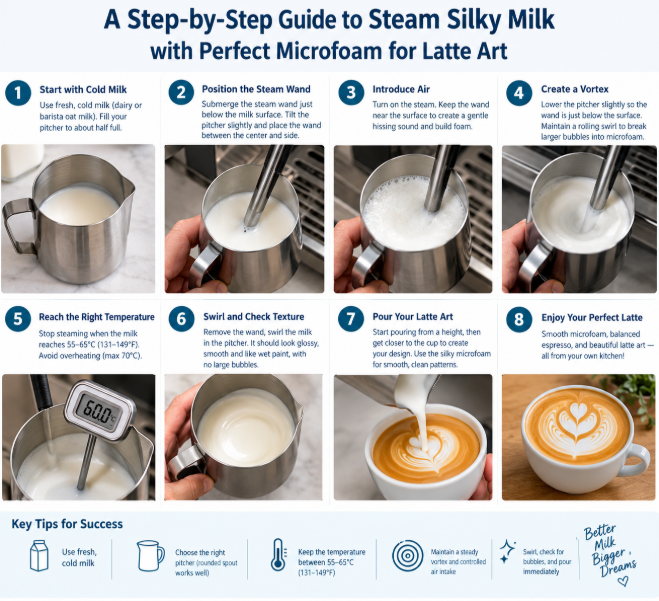
Here, you will learn how to make steam milk with perfect microfoam for latte art with our step-by-step barista guide to silky & glossy texture every time at home.
Ordinary cold milk can become glossy, silky microfoam that pours like wet paint. Baristas often say that steaming is the main reason beginners struggle with latte art: bad steamed milk gives you bad latte art, and well-steamed milk makes pouring feel effortless.
Beautiful latte art starts long before you pour your first heart or tulip. The secret is perfectly steamed milk: silky, glossy, and smooth enough to flow like wet paint. If your milk is full of large bubbles, too thick, or watery, even the best pouring technique will struggle to produce a clean design.
The good news is that you do not need years of barista experience to improve.
By mastering three fundamentals such as steam wand positioning, controlled air intake, and creating a rolling vortex you can make consistent microfoam with a simple practice within 5 minutes.
This guide is specially discussing how to steam milk for latte art step by step, whether you are using a basic home espresso machine or professional equipment.
What Is Microfoam, and Why Does It Matter?
Microfoam is steamed milk containing extremely fine air bubbles that you cannot see them and they are evenly distributed throughout the liquid. Unlike stiff foam with visible bubbles, quality microfoam looks shiny and cohesive, with a texture similar to wet paint. It flows smoothly from the pitcher and blends with espresso while remaining thick enough to create visible patterns.
Milk texture for latte art explained simply: introducing air increases the milk’s volume, while the swirling motion of a vortex breaks larger bubbles into smaller ones and combines the foam with the liquid milk. Heat develops the final texture, but too much heat can damage flavor and sweetness.
Think of the milk as your canvas. When its texture is right, pouring hearts, tulips, and other designs becomes much easier. When the milk is poorly textured, even a skilled hand may struggle to produce a sharp pattern.
Milk Texture for Latte Art Explained
Milk texture for latte art explained simply: you do two things while steaming.
- Introduce air (stretching): steam creates bubbles and the milk rises in the pitcher, looking frothy.
- Create a vortex (texturing): a rolling whirlpool pulls the large bubbles down and shears them into tiny, uniform ones.
The result should look silky, shiny, and almost glowing. The same vortex also mixes the air with the proteins and fat in the milk, which is what creates that smooth finish.
Why Is My Steamed Milk Bubbly for Latte?
If you are asking why is my steamed milk bubbly for latte, the answer is usually too much air at the start or a weak vortex. Large bubbles that never get pulled into the milk leave you with dry foam on top and watery milk underneath.
Before You Start Steaming Milk: Three Things to Get Right
Start With Fresh, Cold Milk
Fresh milk straight from the refrigerator gives you more time to introduce air and incorporate bubbles before the milk reaches its target temperature. Room-temperature milk can steam, but it heats more quickly and leaves less room for error.
Whole dairy milk with around 3.5% fat or more is a useful starting point because it can provide a creamy mouthfeel and a pleasant balance of sweetness and texture. Milk protein also plays an important role in stabilizing the foam.
If you prefer plant-based drinks, look for barista oat milk that steams well for latte art. Barista-style versions are formulated to perform better in coffee, although results vary by brand and machine. Keep the milk cold and use the same product while practicing so you can learn how it behaves.
Pick a Suitable Milk Steaming Pitcher
The best milk steaming pitcher for sharp lines latte art is one that gives you control over milk movement and pouring. A rounded spout is helpful for broader shapes such as hearts and tulips, while a narrower spout can provide thin lines, waves, free pours and delicate patterns.
If you want crisp detail, the best milk steaming pitcher for sharp lines latte art usually has a narrow, well-defined spout
Pitcher capacity matters just as much as spout shape. A practical starting point is to fill the pitcher to roughly half its capacity, or to the manufacturer’s recommended fill line. For example, a 600 ml pitcher can often accommodate about 300 ml of milk. The milk expands as air is introduced, so overfilling can cause spills, while too little milk can make it harder to establish a stable vortex.

A Step by Step Technique: How to Steam Milk for Latte Art
Step 1: Purge and Clean the Steam Wand
Before steaming, briefly release steam to clear any condensed water from the wand. This prevents unwanted water from entering the milk and affecting its texture.
After steaming, wipe the wand immediately with a clean, damp cloth and purge it again to remove milk residue from the tip. This routine helps maintain hygiene, prevents blockages, and keeps your equipment ready for the next drink. Always return the wand to a safe position after use.
Step 2: Position the Wand and Tilt the Pitcher
Place the steam wand tip just below the surface of the cold milk. You should be close enough to introduce air without allowing the wand to sit too deeply in the liquid. A small portion of the tip may remain visible, depending on the machine and pitcher.
Next, tilt the pitcher slightly and position the wand between the center and the side wall rather than directly in the center or against the wall. This arrangement helps the milk circulate in a rolling whirlpool.
A consistent position makes your results more repeatable. You can experiment with the direction of the swirl, but avoid moving the wand randomly while steaming. The goal is a controlled vortex that carries bubbles through the milk.
Step 3: Introduce a Small Amount of Air
Turn on the steam with the wand positioned correctly. Adjust the pitcher height slightly so the tip sits near the surface. You should hear a gentle hissing sound, often compared to paper tearing. This sound indicates that air is entering the milk.
For a latte, introduce air briefly and in a controlled way. More hissing generally means more air and more foam. Less hissing produces less foam. The right amount depends on the drink, but latte art usually benefits from fine, fluid microfoam rather than a thick layer of stiff froth.
Step 4: Create a Rolling Vortex
Once you have introduced enough air, adjust the pitcher so the wand tip is submerged just below the surface. This reduces further air intake while allowing the milk to spin. Maintain the vortex as the milk heats.
The spinning movement draws larger bubbles down and breaks them into smaller ones, blending the foam and liquid into a uniform texture. Use strong, steady steam when your machine supports it. Weak steam may produce a slow vortex that struggles to incorporate larger bubbles. Home machines with lower steam power may simply require more patience.
Step 5: Stop at the Right Temperature
The ideal milk temperature for latte art microfoam is generally around 55–65°C or 131–149°F, with approximately 60°C or 140°F being a useful target. A thermometer is particularly helpful while learning. Experienced baristas may also use the temperature of the pitcher as a rough guide, but touch is less precise.
Avoid overheating the milk beyond 70°C or 158°F. Excessive heat can impair the milk’s flavor and sweetness, leaving the drink tasting less balanced. Turn off the steam before the milk becomes excessively hot, then wait for the steam to stop before removing the pitcher.
Step 6: Swirl, Check, and Pour Immediately
After steaming, swirl the pitcher immediately. The milk should move like a smooth wave washing around the sides, with a glossy surface and no obvious bubbles. If a few large bubbles remain, gently tap the pitcher on the counter and swirl again.
Do not leave the milk sitting for long. Microfoam can separate as it rests, making it harder to pour a clean pattern. Once the texture looks silky and uniform, prepare to pour.
How to Make Microfoam for Latte Art at Home
To learn how to steam milk for latte art for beginners, focus on repeating the same three actions rather than chasing complicated designs: position the wand, introduce a small amount of air, and maintain the vortex. Change only one variable at a time so you can understand what improves the result.
If you want to practice the movement without wasting milk, you can rehearse wand positioning and pitcher control using water with a couple of drops of liquid soap. This creates a foam-like response that can help you practice the sound and swirl.
Do not drink the mixture, and thoroughly clean and rinse the pitcher and wand afterward according to your machine’s cleaning instructions. Switch to real milk to learn its actual texture and temperature behavior.
How to Pour Latte Art With Microfoam
Once your milk is ready, extract your espresso and use a cup with a reasonably wide surface. Begin pouring from slightly higher above the cup, allowing the milk to mix into the espresso. This creates a smooth base for the design.
When the cup is about three-quarters full, bring the pitcher closer to the surface and aim toward the center. Pour steadily to form a white circle. To create a simple heart, lift the pitcher slightly and draw a line through the circle as you finish the pour.
Start with hearts before moving on to tulips or more complex patterns. Consistent milk texture gives you a reliable foundation, so you can concentrate on controlling the pour rather than trying to compensate for poorly steamed milk.
Common Milk Steaming Problems and How to Fix Them
Why Is My Steamed Milk Bubbly for Latte Art?
If you are wondering why is my steamed milk bubbly for latte, check the wand depth, steam strength, and vortex. Placing the tip too close to the surface too suddenly can introduce too much air at once. Weak steam or incorrect positioning may also prevent larger bubbles from being broken down effectively.
How to Fix Big Bubbles in Steamed Milk Latte Art
To understand how to fix big bubbles in steamed milk latte art, first tap the pitcher gently and swirl it to help disperse the remaining bubbles. For your next attempt, introduce air more gradually, then submerge the wand tip slightly to maintain the vortex. If large bubbles keep returning, review your wand position and steam pressure.
Why Is My Microfoam Too Thick for Latte Art?
If you ask, why is my microfoam too thick for latte art, the most likely explanation is excessive air intake or insufficient mixing. Thick, clumpy foam tends to sit on top of the espresso instead of flowing smoothly into a pattern. Add air for a shorter time, then spend the remaining steaming phase maintaining a strong vortex.
What If the Milk Is Too Thin or Watery?
Thin milk usually indicates that too little air was introduced or that the vortex did not incorporate the foam evenly. Listen for the gentle hissing sound during the initial phase, and make sure the milk spins rather than bubbling randomly. A small increase in controlled air intake may help.
Can You Make Microfoam Without a Steam Wand?
If you are wondering how to make microfoam without steam wand, you have a few options, although results are usually less consistent than with a real wand:
- Handheld electric frother: warm the milk carefully, froth just below the surface, gently swirl the container to help distribute the bubbles and finish by submerging the whisk to break up larger bubbles.
- French press: pump heated milk up and down until it thickens, then tap and swirl.
- Jar method: shake warm milk in a sealed jar, then tap and swirl to refine the texture.
In every case, finish by tapping and swirling the pitcher to pop larger bubbles and polish the texture.
These methods can produce foam for home coffee, but they may not replicate the silky, integrated texture that a well-controlled espresso steam wand creates.
Common Mistakes to Avoid When Steaming Milk
- Starting with the wand at the surface: Sudden air intake can create oversized bubbles. Position the tip first, then adjust gradually.
- Using weak steam: A weak vortex may not break down large bubbles effectively. Use the machine’s recommended steam setting.
- Adding too much air: Excessive aeration produces stiff foam that clumps during pouring.
- Placing the wand incorrectly: A wand too close to the wall may create a slow swirl, while a centered wand may cause chaotic bubbling.
- Overheating or underheating: Aim for a consistent target around 55–65°C rather than relying entirely on guesswork.
- Overfilling the pitcher: Expanding milk can spill and become difficult to control.
- Letting milk sit: Swirl immediately and pour while the texture is still cohesive.
- Neglecting cleaning and safety: Wipe and purge the wand after steaming, and keep it away from hands and other people.
These are the most common mistake for steaming milk for latte art, and they are also the key mistakes to avoid when making perfect microfoam in steaming milk. A repeatable process is more valuable than constantly changing your technique.
Frequently Asked Questions
How long should I steam milk for latte art?
There is no single time that works for every machine or milk quantity. Steam power, starting temperature, pitcher size, and air intake all affect the process. Focus on controlled aeration, a stable vortex, and reaching approximately 55–65°C.
How do I know when microfoam is ready?
Ready microfoam looks glossy and smooth, without obvious large bubbles. When you swirl the pitcher, the milk should move like wet paint rather than stiff foam or thin liquid.
Can I use plant-based milk for latte art?
Yes. Barista-style plant milks, including oat milk, can work well. Different formulas behave differently, so start with cold milk and adjust the aeration time to achieve a smooth, pourable texture.
Why does my latte art blur even when I pour carefully?
The milk may be too thin, too thick, or unevenly textured. Review your air intake and vortex first. Proper microfoam is essential because pouring technique alone cannot compensate for poorly textured milk.
What is the ideal milk temperature for latte art microfoam?
Aim for about 55 to 65°C/130 to 150°F. Above 70°C the proteins cook and sweetness is lost.
How much milk should I put in the pitcher?
About half the pitcher’s capacity, or just below the spout. For a 600 ml pitcher, use around 300 ml.
Which milk is best for latte art?
Fresh, cold whole milk with at least 3.5% fat works best. For plant-based options, choose barista editions made for steaming.
Can I use these techniques on a cheap home espresso machine?
Yes. A weaker steam wand just means the process takes longer, so be patient and keep the vortex going.
How do I know if I added the right amount of air?
Swirl the milk. If it moves like glossy wet paint with no visible bubbles, the amount is right. If it resists, you added too much; if it flows like water, too little.
Conclusion: Master the Three Essentials
Learning how to get microfoam when steaming milk for latte is mainly about controlling three things: wand and pitcher positioning, the amount of air you introduce, and the vortex that blends everything together. Start with fresh, cold milk, use an appropriate pitcher, keep the wand clean, and stop steaming before the milk overheats.
Great latte art starts long before you pick up the pitcher to pour. With cold milk, a clean wand, consistent positioning, controlled air, and a steady vortex, you can steam milk with perfect microfoam for latte art in any kitchen or café. Practice with water and soap, adjust your air by ear, and stop when your hand tells you the temperature is right. Consistency will do the rest.
Key takeaways:
-
- Introduce air briefly and listen for a gentle paper-tearing sound.
- Maintain a rolling vortex to incorporate fine bubbles throughout the milk.
- Aim for approximately 55–65°C and avoid overheating.
- Swirl immediately, check for visible bubbles, and pour without delay.
- Practice a simple heart before attempting more advanced latte art.
- Follow three rules: position the wand, add the right air, and hold the vortex.
- Use fresh, cold milk and fill the pitcher to about half capacity.
- Purge and clean the steam wand before and after every use.
Be patient and repeat the same technique until you can produce glossy, fluid milk consistently. Once your microfoam is right, latte art becomes far less frustrating and every cup gives you another opportunity to improve.
